How to do NFT operations in Polkadot Explorer
 VTBDex Updates
Date: January 13th, 2023
VTBCommunity Announcement – How to do NFT operations in Polkadot Explorer
Dear VTBCommunity members,
The VTBCommunity Foundation is happy to announce a guide on NFT operations using Polkadot Explorer.
We sincerely thank all our members for your firm support in making the VTBCommunity a success.
Creating a collection
Each NFT must belong to a collection, so before you can start minting NFTs, you first need to create a collection.
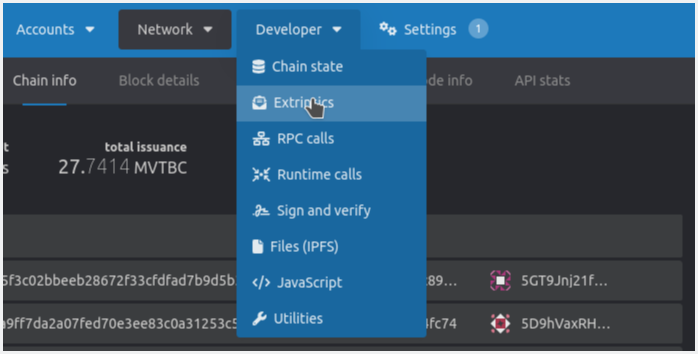
Open this link in your web browser, and go to Developer □ Extrinsics section.
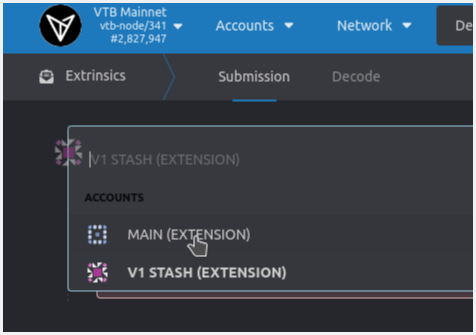
Select your account from the using the selected account drop-down list.
In section, submit the following extrinsic section, select nfts from the left drop-down and select create(admin, config) from the right drop-down.
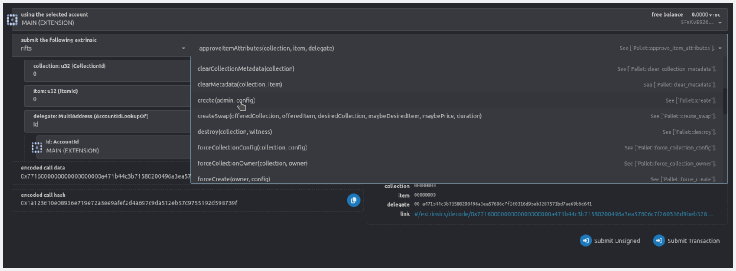
The create(admin, config) function accepts the following arguments:
- admin: MultiAddress (AccountIdLookupOf) : The account that is going to be the admin of this collection.
- settings : This allows disabling some collection specific Pass 0 to not disable anything. Each collection may disable zero or all of the following functionalities:
- Transferrable items : When disabled, the collection items will be non-transferrable,
- Unlocked metadata : When disabled, the metadata for this collection cannot be modified,
- Unlocked attributes : When disabled, the attributes for this collection cannot be modified,
- Deposit required : When disabled, minting items will not require any This option can be set by a super-user only.
- maxSupply (toggle option) allows you to specify the maximum number of items that can be minted.
- mintType gives you the possibility to specify who can mint in your collection:
- Issuer : only you can mint in your collection.
- Public : everyone can mint in your
- HodlerOf : only holders of items in another collection can mint in your This requires knowledge about the ID of the other collection.
- price (toggle option) allows you to specify the price of minting items in your collection.
- startBlock and endBlock give you the possibility to specify a time frame during which the collection’s configuration is valid.
- defaultItemSettings specifies the operations that are disabled by default for individual items when they are minted. The following functionalities can be disabled for each individual item in a collection:
- Transferrable : When disabled, new items will be non-transferrable,
- UnlockedMetadata : When disabled, new items will have locked metadata,
- UnlockedAttributes : When disabled, new items will have locked attributes,
Note that once UnlockedMetadata and UnlockedAttributes settings are disabled for an item, it is no longer possible to change that later.
Insert your desired parameters and then submit the transaction. This will create a new empty collection, next step is to mint items in this collection.
Minting NFTs in a collection
Minting (creating) new NFTs can be done by calling nfts.mint(collection, item, mintTo, witnessData) function.
Creating an NFT
Go back to Developer □ Extrinsics section, and select nfts and mint(collection, item, mintTo, witnessData) in submit the following extrinsic field.
This function accespts the following arguments:
- collection : The id of the collection to which the newly created NFT will belong.
- item : The id that is going to be assigned to the newly created Already existing ids cannot be used.
- mintTo : Account that is going to own the
- witnessData : This field is optional. This is only required if minting NFTs in the selected collection requires a fee (mint price) to be paid, or if the mint condition is the holder of some NFT in a different collection.
- ownedItem : NFT id belonging to a different collection. This only matters if the minting condition in this collection is that the caller must hold some NFT in a different collection. Otherwise you can just pass any id here, or just leave the default ( 0 ) value.
- mintPrice : This must at least be equal to the price of minting items in this collection. The price for minting is set by the collection owner during the creation of the
Enter the required parameters and submit the transaction.
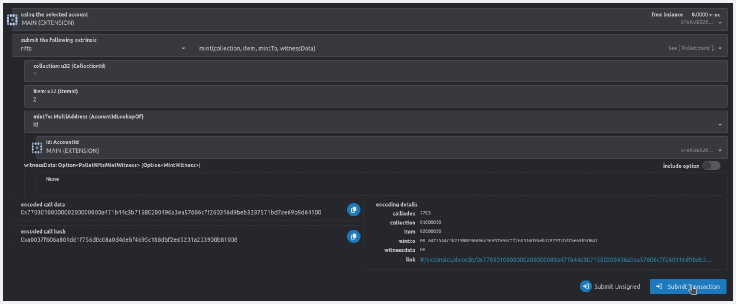
Now a new NFT with the given id is created.
Setting NFT metadata
An NFT without any metadata is not very usefull. Generally you would want to associate some image, or a video file, or a gif with an NFT. NFT metadata can be updated using nfts.set_metadata(collection, item, data) function.
Go to the Developer □ Extrinsics section, and select nfts and set_metadata(collection, item, data) in submit the following extrinsic field.
This function accepts the following parameters:
- collection : Collection id to which your NFT belongs,
- item : Id of your NFT,
- data : Metadata to set to NFT. Metadata can be a URL to an image file, a JSON object describing the NFT, link to a webpage, or anything else you The length of metadata is limited to 256 characters. A common approach is to upload your image file and a JSON file describing the image to IPFS, and setting the link to JSON file as metadata of your NFT. An example JSON file is shown below.
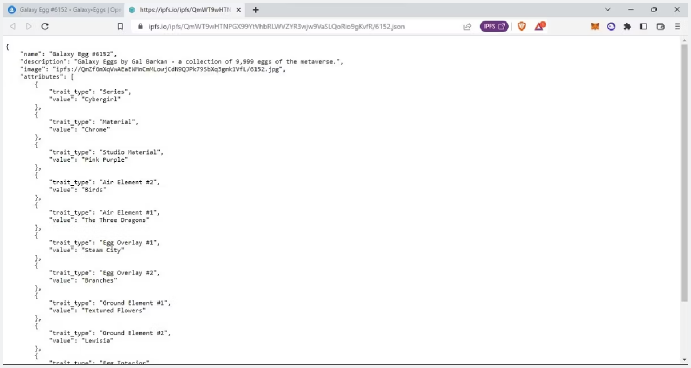
Insert your desired values and submit the transaction.

Buying and selling an NFTs
Selling an NFT
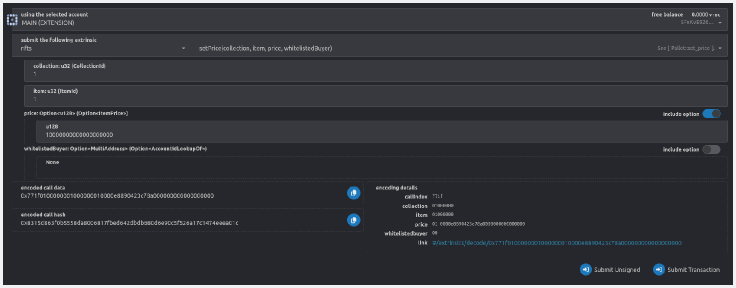
An NFT can be set up for sale by calling nfts.setPrice(collection, item, price, whitelistedBuyer) function.
Go to Developer □ Extrinsics section and select nfts and setPrice(collection, item, price, whitelistedBuyer) in submit the following extrinsic field.
This function accepts the following parameters:
- collection : Collection id which the NFT belongs to,
- item : Id of the NFT,
- price : The price for thie This is an optional field and not setting a price will unlist the NFT from being on sale,
- whitelistedBuyer : An optional account id, if this is set then only this account will be able to buy this NFT.
Insert the values and submit the extrinsic.
Buying an NFT
An NFT can be bought by calling nfts.buyItem(collection, item, bidPrice) function.
Go to Developer □ Extrinsics section and select nfts and buyItem(collection, item, bidPrice) in submit the following extrinsic field.
This function accepts the following parameters:
- collection : Collection id which the NFT belongs to,
- item : Id of the NFT,
- bidPrice : The price that you are willing to pay, this must at least be equal to the price set by the NFT
Insert the values and submit the extrinsic.

Transferring NFTs and Collections
Transferring an NFT
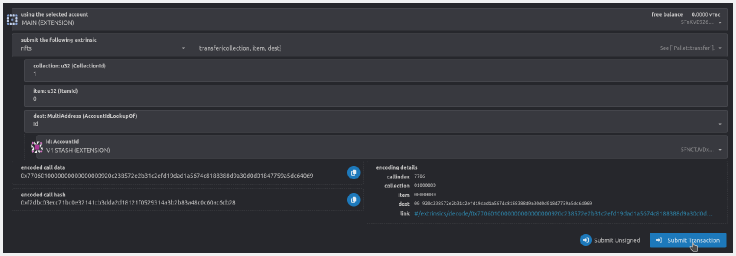
NFTs can be transferred using nfts.transfer(collection, item, dest) function.
Go to Developer □ Extrinsics section and select nfts and transfer(collection, item, dest) in submit the following extrinsic field.
This function accepts the following parameters:
- collection : Collection id which the NFT belongs to,
- item : Id of the NFT,
- dest : The account to which to transfer the NFT.
Insert the values and submit the extrinsic.
Transferring a Collection
Transferring ownership of a collection is done in two steps, the new owner must first tell the chain that this transfer is acceptable, and after that the original owner can transfer the collection.
Accepting ownership
The first step is for the destination account to call the nfts.set_accept_ownership(maybeCollection) function to tell the chain that the transfer of some collection to you is acceptable. This is necessary because a collection owner must reserve some funds to own a collection on the chain. When a collection is transferred the reserved funds are unlocked from the source account and locked in the destination account. So the destination account must also hold the tokens required to be reserved.
Go to Developer □ Extrinsics section and select nfts and set_accept_ownership(maybeCollection) in submit the following extrinsic field.
This function accepts the following parameters:
- maybeCollection : An optional collection If this is not passed then acceptance for all collection transfer is disabled.
Note that acceptance for only one collection transfer can be set at a time, calling the function a second time will overwrite the previous acceptance.
Enter the collection id and submit the extrinsic.

Transferring ownership
Now the ownership of the collection can be transferred by calling nfts.transferOwnership(collection, owner) function.
Go to Developer □ Extrinsics section and select nfts and transferOwnership(collection, owner) in submit the following extrinsic field.
This function accepts the following parameters:
- collection : Id of the collection that needs to be transferred,
- owner : Account id of the new owner.
Enter the collection id and submit the extrinsic.


