Tag Archive for: Updates

Blockchain Interface Improvement for Staking – Completed (UI Manuals)


VTBDex Updates

 Date: February 22, 2024

Available at https://vtbdex.com/


VTBCommunity Announcement – VTBDex – Technical Updates – Blockchain Interface Improvement for Staking – Completed

Dear VTBCommunity members,

We are thrilled to share that the Blockchain Interface for Staking, Nomination, and Nomination Pools has been successfully deployed and is now fully operational.

Consistent with our commitment to transparency and accessibility, comprehensive documentation on how to use the user interface (UI) will be available through the usual informative channels. In line with the aforementioned, we would like to take this opportunity to remind our community members that the VTBCommunity Foundation is a non-custodian operator and does not hold or have any control over the tokens owned by you nor of your private keys.

We are truly excited to witness the positive impact and empowerment our community will experience through this significant enhancement.


COMPREHENSIVE INFORMATION ON HOW TO USE THE USER INTERFACE (UI) FOR STAKING, NOMINATION AND NOMINATION POOLS.

The VTBCommunity Foundation is delighted to introduce a series of comprehensive manuals aimed at enhancing your experience and understanding of various features within our ecosystem. These manuals serve as invaluable resources, offering detailed guidance on key processes essential for active participation.

Below, you will find brief descriptions of each manual:

  1. Claiming Rewards: This manual provides step-by-step instructions on how to claim rewards within our ecosystem. Learn how to access and maximize your rewards efficiently. Download it here.
  2. Nominating using Polkadot JS UI: Dive into the world of nomination by utilizing the Polkadot JS UI. This manual elucidates the process of nominating validators to secure the network and earn rewards. Download it here.
  3. Nomination Pools using Polkadot JS UI: Explore the concept of nomination pools and learn how to participate using the Polkadot JS UI. Download it here.
  4. Nomination Pools using DEX UI: Delve into nomination pools through the Dex UI interface. This manual provides comprehensive guidance on leveraging the Dex UI for participating in nomination pools efficiently. Download it here.
  5. Nomination using DEX: How to nominate validators seamlessly and contribute to the security and decentralization of the network. Download it here.

Each manual is meticulously crafted to empower you with the knowledge and skills necessary to navigate our platform effectively. Whether you are a novice or an experienced user, these resources are designed to cater to your needs and facilitate your journey within our community.

We encourage you to explore these manuals at your convenience and leverage them to elevate your participation within our ecosystem.

Thank you,

The VTBCommunity Foundation
vtbcommunity.org


How to do NFT operations in Polkadot Explorer


VTBDex Updates

 Date: January 13th, 2023


VTBCommunity Announcement – How to do NFT operations in Polkadot Explorer

Dear VTBCommunity members,

The VTBCommunity Foundation is happy to announce a guide on NFT operations using Polkadot Explorer.

We sincerely thank all our members for your firm support in making the VTBCommunity a success.


Creating a collection

Each NFT must belong to a collection, so before you can start minting NFTs, you first need to create a collection.

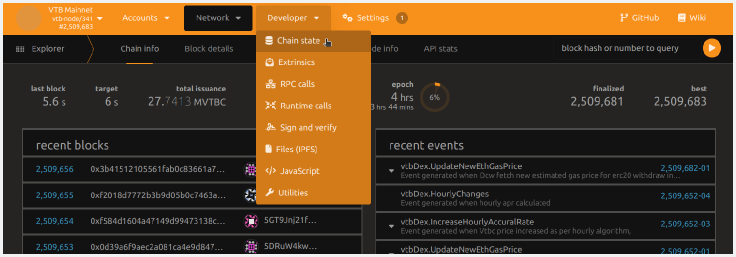
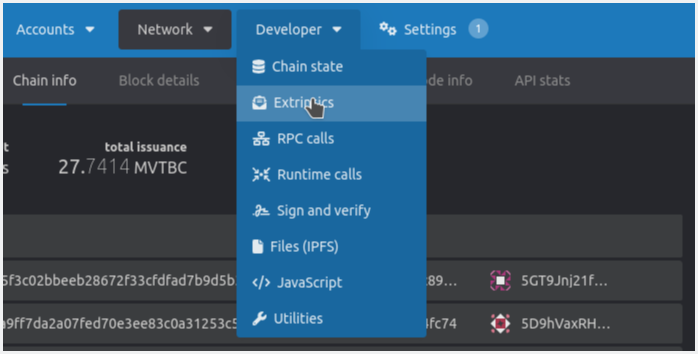
Open this link in your web browser, and go to Developer □ Extrinsics section.

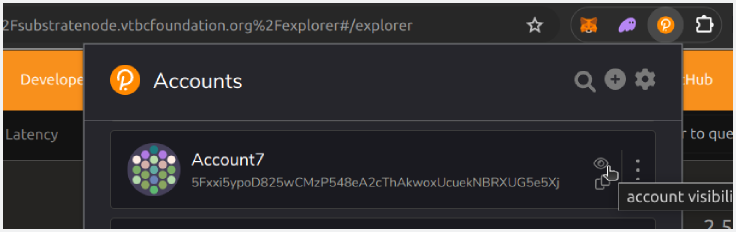
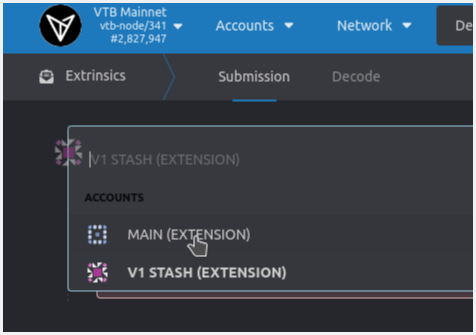
Select your account from the using the selected account drop-down list.

In section,  submit the following extrinsic section, select nfts from the left drop-down and select create(admin, config) from the right drop-down.

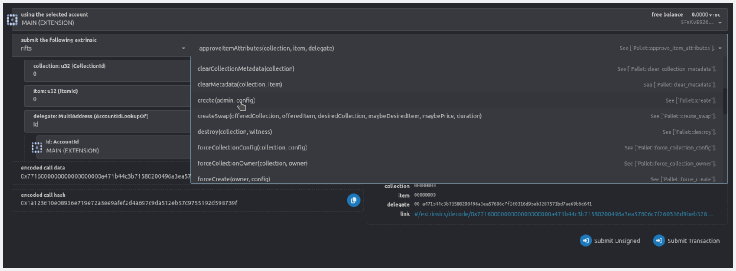
The create(admin, config) function accepts the following arguments:

  • admin: MultiAddress (AccountIdLookupOf) : The account that is going to be the admin of this collection.
  • settings : This allows disabling some collection specific Pass 0 to not disable anything. Each collection may disable zero or all of the following functionalities:
    • Transferrable items : When disabled, the collection items will be non-transferrable,
    • Unlocked metadata : When disabled, the metadata for this collection cannot be modified,
    • Unlocked attributes : When disabled, the attributes for this collection cannot be modified,
    • Deposit required : When disabled, minting items will not require any This option can be set by a super-user only.
  • maxSupply (toggle option) allows you to specify the maximum number of items that can be minted.
  • mintType gives you the possibility to specify who can mint in your collection:
    • Issuer : only you can mint in your collection.
    • Public : everyone can mint in your
    • HodlerOf : only holders of items in another collection can mint in your This requires knowledge about the ID of the other collection.
  • price (toggle option) allows you to specify the price of minting items in your collection.
  • startBlock and endBlock give you the possibility to specify a time frame during which the collection’s configuration is valid.
  • defaultItemSettings specifies the operations that are disabled by default for individual items when they are minted. The following functionalities can be disabled for each individual item in a collection:
  • Transferrable : When disabled, new items will be non-transferrable,
  • UnlockedMetadata : When disabled, new items will have locked metadata,
  • UnlockedAttributes : When disabled, new items will have locked attributes,

Note that once UnlockedMetadata and UnlockedAttributes settings are disabled for an item, it is no longer possible to change that later.

Insert your desired parameters and then submit the transaction. This will create a new empty collection, next step is to mint items in this collection.


Minting NFTs in a collection

Minting (creating) new NFTs can be done by calling nfts.mint(collection, item, mintTo, witnessData) function.


Creating an NFT

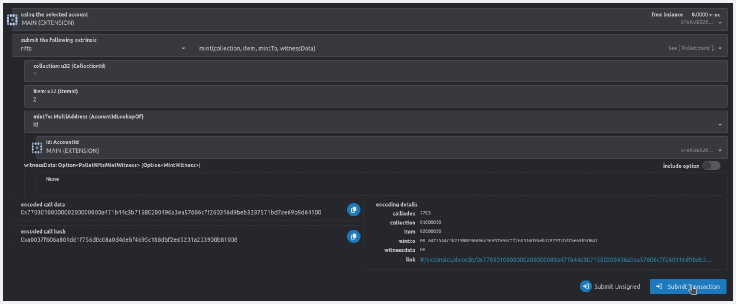
Go back to Developer □ Extrinsics section, and select nfts and mint(collection, item, mintTo, witnessData) in submit the following extrinsic field.

This function accespts the following arguments:

  • collection : The id of the collection to which the newly created NFT will belong.
  • item : The id that is going to be assigned to the newly created Already existing ids cannot be used.
  • mintTo : Account that is going to own the
  • witnessData : This field is optional. This is only required if minting NFTs in the selected collection requires a fee (mint price) to be paid, or if the mint condition is the holder of some NFT in a different collection.
    • ownedItem : NFT id belonging to a different collection. This only matters if the minting condition in this collection is that the caller must hold some NFT in a different collection. Otherwise you can just pass any id here, or just leave the default ( 0 ) value.
    • mintPrice : This must at least be equal to the price of minting items in this collection. The price for minting is set by the collection owner during the creation of the

Enter the required parameters and submit the transaction.

Now a new NFT with the given id is created.


Setting NFT metadata

An NFT without any metadata is not very usefull. Generally you would want to associate some image, or a video file, or a gif with an NFT. NFT metadata can be updated using nfts.set_metadata(collection, item, data) function.

Go to the Developer □ Extrinsics section, and select nfts and set_metadata(collection, item, data) in submit the following extrinsic field.

This function accepts the following parameters:

  • collection : Collection id to which your NFT belongs,
  • item : Id of your NFT,
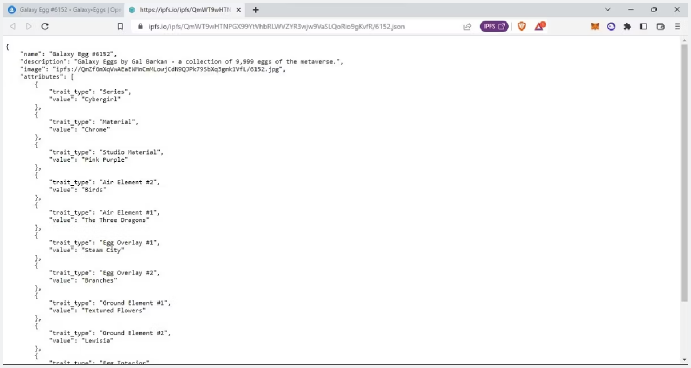
  • data : Metadata to set to NFT. Metadata can be a URL to an image file, a JSON object describing the NFT, link to a webpage, or anything else you The length of metadata is limited to 256 characters. A common approach is to upload your image file and a JSON file describing the image to IPFS, and setting the link to JSON file as metadata of your NFT. An example JSON file is shown below.

Insert your desired values and submit the transaction.


Buying and selling an NFTs

Selling an NFT

An NFT can be set up for sale by calling nfts.setPrice(collection, item, price, whitelistedBuyer) function.

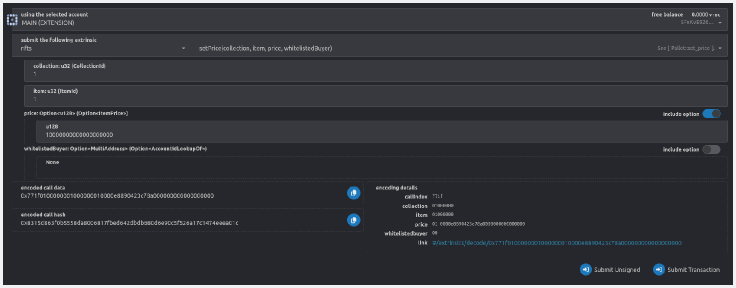
Go to Developer □ Extrinsics  section and select nfts and setPrice(collection, item, price, whitelistedBuyer) in submit the following extrinsic field.

This function accepts the following parameters:

  • collection : Collection id which the NFT belongs to,
  • item : Id of the NFT,
  • price : The price for thie This is an optional field and not setting a price will unlist the NFT from being on sale,
  • whitelistedBuyer : An optional account id, if this is set then only this account will be able to buy this NFT.

Insert the values and submit the extrinsic.


Buying an NFT

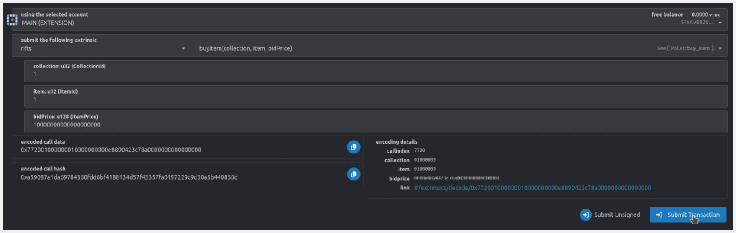
An NFT can be bought by calling nfts.buyItem(collection, item, bidPrice) function.

 Go to Developer □ Extrinsics section and select nfts and buyItem(collection, item, bidPrice) in submit the following extrinsic field.

This function accepts the following parameters:

  • collection : Collection id which the NFT belongs to,
  • item : Id of the NFT,
  • bidPrice : The price that you are willing to pay, this must at least be equal to the price set by the NFT

Insert the values and submit the extrinsic.


Transferring NFTs and Collections

Transferring an NFT

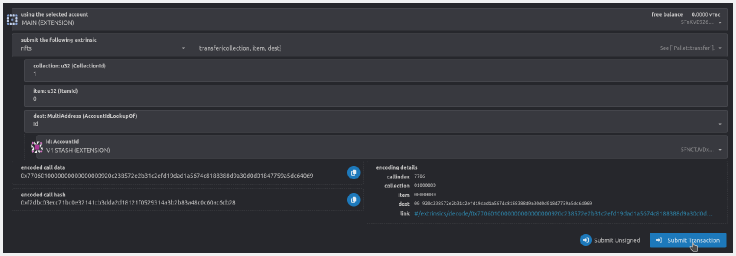
NFTs can be transferred using nfts.transfer(collection, item, dest) function.

Go to Developer □ Extrinsics section and select nfts and transfer(collection, item, dest) in submit the following extrinsic field.

This function accepts the following parameters:

  • collection : Collection id which the NFT belongs to,
  • item : Id of the NFT,
  • dest : The account to which to transfer the NFT.

Insert the values and submit the extrinsic.


Transferring a Collection

Transferring ownership of a collection is done in two steps, the new owner must first tell the chain that this transfer is acceptable, and after that the original owner can transfer the collection.


Accepting ownership

The first step is for the destination account to call the nfts.set_accept_ownership(maybeCollection) function to tell the chain that the transfer of some collection to you is acceptable. This is necessary because a collection owner must reserve some funds to own a collection on the chain. When a collection is transferred the reserved funds are unlocked from the source account and locked in the destination account. So the destination account must also hold the tokens required to be reserved.

Go to Developer □ Extrinsics section and select nfts and set_accept_ownership(maybeCollection) in submit the following extrinsic field.

This function accepts the following parameters:

  • maybeCollection : An optional collection If this is not passed then acceptance for all collection transfer is disabled.

Note that acceptance for only one collection transfer can be set at a time, calling the function a second time will overwrite the previous acceptance.

Enter the collection id and submit the extrinsic.


Transferring ownership

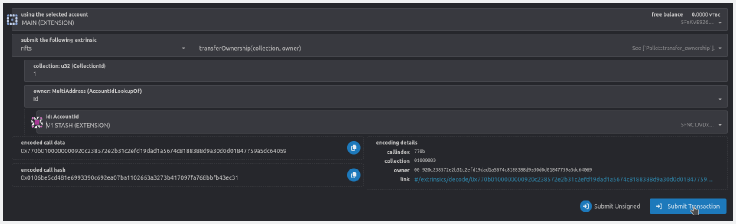
Now the ownership of the collection can be transferred by calling nfts.transferOwnership(collection, owner) function.

Go to Developer □ Extrinsics section and select nfts and transferOwnership(collection, owner) in submit the following extrinsic field.

This function accepts the following parameters:

  • collection : Id of the collection that needs to be transferred,
  • owner : Account id of the new owner.

Enter the collection id and submit the extrinsic.

VTBCommunity Blockchain Updates: How to check VTBC/VTBT balances in Polkadot Explorer


VTBDex Updates

 Date: December 14th, 2023


VTBCommunity Announcement – Accessing the VTB Blockchain Outside of the VTBDex – How to check VTBC/VTBT balances in Polkadot Explorer

Dear VTBCommunity members,

The VTBCommunity Foundation is committed to transparency with all VTBCommunity members and would like to take a moment to explain how the VTB Blockchain can be accessed without the need for the VTBDex. For this reason, we have created the following guide for anyone wishing to conduct their exchanges without going through VTBDex.

Once again, we wish to express our deep gratitude to all our members for your firm support in making the VTBCommunity a success.

Thank you,

The VTBCommunity Foundation
vtbcommunity.org


How to check VTBC/VTBT balances in Polkadot Explorer

Steps to install the Polkadot-js extension

Step 1: Go to this page

Step 2: Click the download button

Step 3: Click Add to Chrome button

Step 4: Click Add extension

Step 5: Now the Polkadot extension should be installed.

Steps to create an account

Step 1: Click the extensions button in the top right corner.

Step 2: Select the polkadot-js extension. This will open a new popup which will show all your accounts. If the extension is newly installed there should be no accounts yet.

Step 3: Now click the plus ( + ) sign in the top right corner of the popup and select Create new Account. This will open the account creation page.

Step 4: The next page will show your newly created account key (also known as a secret phrase or a mnemonic). The secret phrase is like a password, so anyone with access to the phrase can interact with the blockchain using your account. Copy the phrase to a secure location.

Step 5: Click I have saved my mnemonic seed safely and then click Next step

Step 6: On the next page select Allow use on any chain in the network list, and set a name, and a password for your account. And finally, click on the add account button.

Step 7: Now your account should be added to the extension.


Steps to check the VTBC balance

Step 1: Open this link in your web browser.

Step 2: Click on Developer >> Chain state.

Step 3: Select system from the selected state query drop-down list.

Step 4: Select account(AccountId32): FrameSystemAccountInfo from the next drop-down list.

Step 5: Ensure that your account is visible in the Polkadot js extension.

Step 6: Paste your ss58 account ID into the AccountId32 box or select it from the drop-down list.

Step 7: Now click the + icon in the upper right corner.

Step 8: You will get a response like the screenshot below. The balance mentioned next to free is your VTBC balance.


Steps to check the External Tokens (Eth/Eos/Usdt/Usdc) balances

Step 1: Open this link in your web browser.

Step 2: Click on Developer >> Chain state.

Step 3: Select externalTokens from the selected state query drop-down list.

Step 4: Select account(AccountId32): FrameSystemAccountInfo from the next drop-down list.

Step 5: Ensure your account is visible in the Polkadot js extension.

Step 6: Paste your ss58 account ID into the AccountId32 box or select it from the drop-down list.

A – If you want to check the balance of a single crypto token

Step 7A: Select the crypto token (Eos/Eth/Usdt/Usdc) from the VtbUtilsCurrencyTypesTokenType drop-down list. 

Step 8A: Now click the + icon in the upper right corner.

Step 9A: You will get a response like the screenshot below. The balance mentioned next to balance is your selected token balance.

B – If you want to get all the external crypto token balances

Step 7B: Please close the include option toggle button.

Step 8B: Now click the + icon in the upper right corner. 

Step 9B: You will get a response like the screenshot below. You can see the balances of the crypto tokens in their corresponding structure.

Note: You need to scroll down this response to see all the details.

VTBCommunity Blockchain Updates: EOS Nodes, APR Efficiency, and Expanded Fee Payments


VTBDex Updates

 Date: July 27th, 2023 – Available on July 31st, 2023

Available at https://vtbdex.com/


VTBCommunity Announcement – VTBDex Technical Updates – VTBCommunity Blockchain: EOS Nodes, APR Efficiency, and Expanded Fee Payments

Dear VTBCommunity members,

The VTBCommunity Foundation is excited to bring you the latest key updates regarding the VTBCommunity Blockchain. The Foundation’s team has been diligently working to improve various aspects of the platform, with a focus on optimizing performance and enhancing the overall user experience.

Updated EOS Node: Embracing the Latest Advancements

The VTBCommunity Foundation is pleased to inform you that it has implemented a comprehensive update to its EOS node. By upgrading to newer versions, the Foundation ensures that the VTBCommunity Blockchain remains at the forefront of technological advancements, enhancing its capabilities and security.

This update also involves removing overhead from the node, resulting in a more streamlined and efficient system. As a result, the response time for transactions and other activities on the blockchain has significantly improved. VTBCommunity users can now experience faster and smoother interactions within the platform.

Furthermore, this update provides us with better control over data management, ensuring that the blockchain operates with enhanced stability and reliability.

Optimizing APR Calculation Computational Overhead: Ensuring Efficiency and Accuracy

The VTBCommunity Foundation understands the importance of computational efficiency in blockchain operations. To that end, the Foundation’s team has diligently worked on optimizing the APR (Annual Percentage Rate) calculation computational overhead on the VTBCommunity Blockchain.

By reducing the computational requirements, the platform’s performance is enhanced, allowing for smoother and quicker APR calculations. This optimization also improves the robustness of the calculations, ensuring accurate and reliable results.

The commitment of the Foundation to efficiency and accuracy ensures that its users can enjoy transparent and precise APR information, enabling them to make informed decisions within the VTBCommunity ecosystem.

Expanded Fee Payment Options: A More Versatile Crypto Experience

To enhance accessibility and flexibility, the VTBCommunity Foundation is delighted to announce the expansion of fee payment options on the VTBCommunity platform. Users now have the convenience of using all cryptocurrencies, including VTBT and VTBC, for fee payments.

This enhancement eliminates the need for users to make ETH/EOS deposits for fee payments, offering a seamless and efficient transfer process between accounts. Additionally, users can convert their cryptocurrencies directly, simplifying their interactions within the ecosystem.

With these changes, the VTBCommunity Foundation strives to create a more user-friendly experience, making it easier for community members to engage with the VTBCommunity Blockchain and enjoy its various features.

Conclusion

The VTBCommunity Foundation remains committed to constant improvement and innovation. With the updated EOS node, optimized APR calculations, and expanded fee payment options, the Foundation aims to provide community members with an exceptional blockchain experience.

The VTBCommunity Foundation extends its heartfelt gratitude to all VTBCommunity members for their unwavering support and active involvement in its journey. Your valuable feedback and continued participation drive the Foundation forward as we strive to build a stronger, more efficient, and user-centric blockchain ecosystem.

Thank you,

The VTBCommunity Foundation